> ## Documentation Index
> Fetch the complete documentation index at: https://openlayer.com/docs/llms.txt
> Use this file to discover all available pages before exploring further.
# Google Gemini
> Learn how to evaluate Google Gemini models and use them as LLM judges with Openlayer
 Openlayer integrates with [Google Gemini](https://ai.google.dev/) in two ways:
* If you are building an AI system with Google Gemini models and want to
evaluate it, you can use the [SDKs](/docs/api-reference/sdk/overview) to make
Openlayer part of your workflow.
* Some tests on Openlayer are based on a score produced by an LLM judge. You can
use a Google Gemini model as the LLM judge for these tests.
This integration guide explores each of these paths.
Building **multi-agent systems** with Google Agent Development Kit? Check out
the [Google ADK integration](/docs/integrations/google-adk) page for comprehensive
tracing of agent conversations, handoffs, and tool usage.
## Evaluating Google Gemini models
You can set up Openlayer tests to evaluate your Google Gemini models
in [monitoring](/docs/monitoring/overview) and [development](/docs/development/overview).
### Monitoring
To use the [monitoring mode](/docs/monitoring/overview), you must instrument your code to publish
the requests your AI system receives to the Openlayer platform.
Openlayer traces the [Google Gen AI SDK](https://googleapis.github.io/python-genai/) — the `google-genai`
package in Python and `@google/genai` in TypeScript — whose entry point is a `Client` object.
To set it up, you must follow the steps in the code snippet below:
```python Python theme={null}
# 1. Install required packages
# !pip install google-genai openlayer
# 2. Set the environment variables
import os
os.environ["GOOGLE_AI_API_KEY"] = "YOUR_GOOGLE_AI_API_KEY_HERE"
os.environ["OPENLAYER_API_KEY"] = "YOUR_OPENLAYER_API_KEY_HERE"
os.environ["OPENLAYER_INFERENCE_PIPELINE_ID"] = "YOUR_OPENLAYER_INFERENCE_PIPELINE_ID_HERE"
# 3. Call `init` to auto-instrument the installed LLM SDKs (Google Gen AI, etc.)
from openlayer.lib import init
init()
# 4. Create the client. Build it after `init()`, which is what makes it traced
from google import genai
client = genai.Client(api_key=os.environ["GOOGLE_AI_API_KEY"]) # auto-traced by Openlayer
# 5. From now on, every generation call with
# the `client` is traced by Openlayer. E.g.,
response = client.models.generate_content(
model="gemini-2.5-flash",
contents="How are you doing today?",
)
```
```javascript TypeScript theme={null}
// 1. Install required packages
// npm install @google/genai openlayer
// 2. Set the environment variables:
// GOOGLE_AI_API_KEY
// OPENLAYER_API_KEY
// OPENLAYER_INFERENCE_PIPELINE_ID
// 3. Wrap the client with `traceGoogleGenAI`. It patches the client in place
// and hands it back, so there is no separate `init()` step in TypeScript.
import { GoogleGenAI } from "@google/genai";
import { traceGoogleGenAI } from "openlayer/lib/integrations/googleGenAiTracer";
const client = traceGoogleGenAI(
new GoogleGenAI({ apiKey: process.env["GOOGLE_AI_API_KEY"] ?? "" }),
);
// 4. From now on, every generation call with
// the `client` is traced by Openlayer. E.g.,
const response = await client.models.generateContent({
model: "gemini-2.5-flash",
contents: "How are you doing today?",
});
```
}
iconType="duotone"
href="https://github.com/openlayer-ai/openlayer-ts/blob/main/examples/google-genai-tracing.ts"
/>
Once the code is instrumented, all your Google Gemini model calls are automatically published to Openlayer,
along with metadata, such as latency, number of tokens, cost estimate, and more.
Wrapping the client once covers `generate_content` and `generate_content_stream` (`generateContent` and
`generateContentStream` in TypeScript). Chat sessions created with `client.chats` go through the same object,
so they are traced without any extra setup. In Python, the asynchronous equivalents under `client.aio.models`
are covered too.
On Gemini 2.5 models, thinking is on by default and the Google API reports
thinking tokens separately from the answer tokens. Openlayer counts them as
completion tokens, because that is how they are billed — so the cost estimate
on the step reflects what you actually pay.
#### Vertex AI
The same client class serves both Google AI Studio and Vertex AI, so tracing works the same way in both. To
call Gemini through Vertex AI, construct the client with `vertexai=True` (`vertexai: true` in TypeScript)
and let Google's SDK pick up your Google Cloud credentials:
```python Python theme={null}
client = genai.Client( # auto-traced by Openlayer
vertexai=True,
project="YOUR_GCP_PROJECT",
location="us-central1",
)
```
```javascript TypeScript theme={null}
const client = traceGoogleGenAI(
new GoogleGenAI({
vertexai: true,
project: "YOUR_GCP_PROJECT",
location: "us-central1",
}),
);
```
Openlayer tags the steps produced by a Vertex AI client with `llm_system: google_vertex` in their metadata,
so you can tell the two backends apart on the "Data" page.
If the Google Gemini model call is just one of the steps of your AI system,
you can use the code snippets above together with
[tracing](/docs/monitoring/tracing). In this case, your Gemini calls get added as a
step of a larger trace. Refer to the [Tracing guide](/docs/monitoring/tracing) for
details.
Google's `google-generativeai` package — the one you import as
`google.generativeai` and use through `genai.GenerativeModel` — is in
maintenance mode. Openlayer still traces it, and both packages can be
installed side by side, so you can migrate at your own pace. Calls from either
package produce the same "Gemini Generation" step, which keeps your dashboards
intact across the switch.
```python Python theme={null}
# !pip install google-generativeai openlayer
import os
import google.generativeai as genai
os.environ["GOOGLE_AI_API_KEY"] = "YOUR_GOOGLE_AI_API_KEY_HERE"
os.environ["OPENLAYER_API_KEY"] = "YOUR_OPENLAYER_API_KEY_HERE"
os.environ["OPENLAYER_INFERENCE_PIPELINE_ID"] = "YOUR_OPENLAYER_INFERENCE_PIPELINE_ID_HERE"
genai.configure(api_key=os.environ["GOOGLE_AI_API_KEY"])
from openlayer.lib import init
init()
model = genai.GenerativeModel("gemini-2.5-flash") # auto-traced by Openlayer
response = model.generate_content("How are you doing today?")
```
After your AI system requests are continuously published and logged by Openlayer, you can
[create tests](/docs/tests/overview) that run at a regular cadence on top of them.
Refer to the [Monitoring overview](/docs/monitoring/overview), for details on Openlayer's
monitoring mode, to the [Publishing data guide](/docs/monitoring/publishing-data), for more
information on setting it up, or to the [Tracing guide](/docs/monitoring/tracing), to
understand how to trace more complex systems.
### Development
In [development mode](/docs/development/overview), Openlayer becomes a step in
your CI/CD pipeline, and your tests get automatically evaluated after being triggered
by some events.
Openlayer tests often rely on your AI system's outputs on a validation
dataset. As discussed in the
[Configuring output generation guide](/docs/development/configuring-output-generation),
you have two options:
1. either provide a way for Openlayer to run your AI system on your datasets, or
2. before pushing, generate the model outputs yourself and push them alongside your
artifacts.
For AI systems built with Google Gemini models, if you are **not** computing
your system's outputs yourself, you must provide your **API credentials**.
To do so, navigate to "**Workspace settings**" -> "**Environment variables**," and click on "Add secret" to
add your `GOOGLE_AI_API_KEY`.
If you don't add the required Google AI API key, you'll encounter a "Missing API key"
error when Openlayer tries to run your AI system to get its outputs.
Make sure to read the API key from the environment in the script you provide
as the `batchCommand` in the [openlayer.json](/docs/development/openlayer-json):
```python theme={null}
import os
from google import genai
client = genai.Client(api_key=os.environ["GOOGLE_AI_API_KEY"])
```
## Using Google Gemini models as the LLM judge
Some tests on Openlayer rely on scores produced by an LLM judge. For example,
tests that use [Ragas metrics](/docs/integrations/ragas) and the custom [LLM
evaluator test](/docs/tests/catalog/l-l-m-rubric-threshold).
You can use a Google Gemini model through Google AI Studio or Vertex AI as the
underlying LLM judge for these tests.
First, go to **Settings** → **Environment** at the workspace or project level
and add one of the following authentication methods. Provider credentials are
not entered on the LLM-as-a-judge page.
### Google AI Studio
Choose **API Authentication** and add your `GOOGLE_API_KEY`.
### Vertex AI with service-account JSON
Choose **Vertex AI Service Account Authentication** and add:
* `GOOGLE_GENAI_USE_VERTEXAI` with the value `true`
* `GOOGLE_CLOUD_PROJECT` with your Google Cloud project ID
* `GOOGLE_APPLICATION_CREDENTIALS_JSON` with the full contents of your
[service-account JSON key
file](https://cloud.google.com/iam/docs/keys-create-delete)
Use this option on Openlayer Cloud, where you cannot mount a key file, or
whenever you prefer to store the credentials as an Openlayer secret.
### Vertex AI with self-hosted credentials
For a self-hosted Openlayer deployment, choose **Vertex AI Authentication** and
add `GOOGLE_GENAI_USE_VERTEXAI` with the value `true` and
`GOOGLE_CLOUD_PROJECT` with your Google Cloud project ID.
Your deployment can then authenticate with Application Default Credentials, a
mounted service-account key file referenced by
`GOOGLE_APPLICATION_CREDENTIALS`, or Workload Identity.
For either Vertex AI option, you can also set `GOOGLE_CLOUD_LOCATION`. It
defaults to `us-central1`.
### Select the judge model
Open your project and go to **Settings** → **LLM-as-a-judge**. Under **Default
LLM**, choose **Google**, type a Gemini model name, such as
`gemini-2.0-flash`, and select **Select**.
Openlayer integrates with [Google Gemini](https://ai.google.dev/) in two ways:
* If you are building an AI system with Google Gemini models and want to
evaluate it, you can use the [SDKs](/docs/api-reference/sdk/overview) to make
Openlayer part of your workflow.
* Some tests on Openlayer are based on a score produced by an LLM judge. You can
use a Google Gemini model as the LLM judge for these tests.
This integration guide explores each of these paths.
Building **multi-agent systems** with Google Agent Development Kit? Check out
the [Google ADK integration](/docs/integrations/google-adk) page for comprehensive
tracing of agent conversations, handoffs, and tool usage.
## Evaluating Google Gemini models
You can set up Openlayer tests to evaluate your Google Gemini models
in [monitoring](/docs/monitoring/overview) and [development](/docs/development/overview).
### Monitoring
To use the [monitoring mode](/docs/monitoring/overview), you must instrument your code to publish
the requests your AI system receives to the Openlayer platform.
Openlayer traces the [Google Gen AI SDK](https://googleapis.github.io/python-genai/) — the `google-genai`
package in Python and `@google/genai` in TypeScript — whose entry point is a `Client` object.
To set it up, you must follow the steps in the code snippet below:
```python Python theme={null}
# 1. Install required packages
# !pip install google-genai openlayer
# 2. Set the environment variables
import os
os.environ["GOOGLE_AI_API_KEY"] = "YOUR_GOOGLE_AI_API_KEY_HERE"
os.environ["OPENLAYER_API_KEY"] = "YOUR_OPENLAYER_API_KEY_HERE"
os.environ["OPENLAYER_INFERENCE_PIPELINE_ID"] = "YOUR_OPENLAYER_INFERENCE_PIPELINE_ID_HERE"
# 3. Call `init` to auto-instrument the installed LLM SDKs (Google Gen AI, etc.)
from openlayer.lib import init
init()
# 4. Create the client. Build it after `init()`, which is what makes it traced
from google import genai
client = genai.Client(api_key=os.environ["GOOGLE_AI_API_KEY"]) # auto-traced by Openlayer
# 5. From now on, every generation call with
# the `client` is traced by Openlayer. E.g.,
response = client.models.generate_content(
model="gemini-2.5-flash",
contents="How are you doing today?",
)
```
```javascript TypeScript theme={null}
// 1. Install required packages
// npm install @google/genai openlayer
// 2. Set the environment variables:
// GOOGLE_AI_API_KEY
// OPENLAYER_API_KEY
// OPENLAYER_INFERENCE_PIPELINE_ID
// 3. Wrap the client with `traceGoogleGenAI`. It patches the client in place
// and hands it back, so there is no separate `init()` step in TypeScript.
import { GoogleGenAI } from "@google/genai";
import { traceGoogleGenAI } from "openlayer/lib/integrations/googleGenAiTracer";
const client = traceGoogleGenAI(
new GoogleGenAI({ apiKey: process.env["GOOGLE_AI_API_KEY"] ?? "" }),
);
// 4. From now on, every generation call with
// the `client` is traced by Openlayer. E.g.,
const response = await client.models.generateContent({
model: "gemini-2.5-flash",
contents: "How are you doing today?",
});
```
}
iconType="duotone"
href="https://github.com/openlayer-ai/openlayer-ts/blob/main/examples/google-genai-tracing.ts"
/>
Once the code is instrumented, all your Google Gemini model calls are automatically published to Openlayer,
along with metadata, such as latency, number of tokens, cost estimate, and more.
Wrapping the client once covers `generate_content` and `generate_content_stream` (`generateContent` and
`generateContentStream` in TypeScript). Chat sessions created with `client.chats` go through the same object,
so they are traced without any extra setup. In Python, the asynchronous equivalents under `client.aio.models`
are covered too.
On Gemini 2.5 models, thinking is on by default and the Google API reports
thinking tokens separately from the answer tokens. Openlayer counts them as
completion tokens, because that is how they are billed — so the cost estimate
on the step reflects what you actually pay.
#### Vertex AI
The same client class serves both Google AI Studio and Vertex AI, so tracing works the same way in both. To
call Gemini through Vertex AI, construct the client with `vertexai=True` (`vertexai: true` in TypeScript)
and let Google's SDK pick up your Google Cloud credentials:
```python Python theme={null}
client = genai.Client( # auto-traced by Openlayer
vertexai=True,
project="YOUR_GCP_PROJECT",
location="us-central1",
)
```
```javascript TypeScript theme={null}
const client = traceGoogleGenAI(
new GoogleGenAI({
vertexai: true,
project: "YOUR_GCP_PROJECT",
location: "us-central1",
}),
);
```
Openlayer tags the steps produced by a Vertex AI client with `llm_system: google_vertex` in their metadata,
so you can tell the two backends apart on the "Data" page.
If the Google Gemini model call is just one of the steps of your AI system,
you can use the code snippets above together with
[tracing](/docs/monitoring/tracing). In this case, your Gemini calls get added as a
step of a larger trace. Refer to the [Tracing guide](/docs/monitoring/tracing) for
details.
Google's `google-generativeai` package — the one you import as
`google.generativeai` and use through `genai.GenerativeModel` — is in
maintenance mode. Openlayer still traces it, and both packages can be
installed side by side, so you can migrate at your own pace. Calls from either
package produce the same "Gemini Generation" step, which keeps your dashboards
intact across the switch.
```python Python theme={null}
# !pip install google-generativeai openlayer
import os
import google.generativeai as genai
os.environ["GOOGLE_AI_API_KEY"] = "YOUR_GOOGLE_AI_API_KEY_HERE"
os.environ["OPENLAYER_API_KEY"] = "YOUR_OPENLAYER_API_KEY_HERE"
os.environ["OPENLAYER_INFERENCE_PIPELINE_ID"] = "YOUR_OPENLAYER_INFERENCE_PIPELINE_ID_HERE"
genai.configure(api_key=os.environ["GOOGLE_AI_API_KEY"])
from openlayer.lib import init
init()
model = genai.GenerativeModel("gemini-2.5-flash") # auto-traced by Openlayer
response = model.generate_content("How are you doing today?")
```
After your AI system requests are continuously published and logged by Openlayer, you can
[create tests](/docs/tests/overview) that run at a regular cadence on top of them.
Refer to the [Monitoring overview](/docs/monitoring/overview), for details on Openlayer's
monitoring mode, to the [Publishing data guide](/docs/monitoring/publishing-data), for more
information on setting it up, or to the [Tracing guide](/docs/monitoring/tracing), to
understand how to trace more complex systems.
### Development
In [development mode](/docs/development/overview), Openlayer becomes a step in
your CI/CD pipeline, and your tests get automatically evaluated after being triggered
by some events.
Openlayer tests often rely on your AI system's outputs on a validation
dataset. As discussed in the
[Configuring output generation guide](/docs/development/configuring-output-generation),
you have two options:
1. either provide a way for Openlayer to run your AI system on your datasets, or
2. before pushing, generate the model outputs yourself and push them alongside your
artifacts.
For AI systems built with Google Gemini models, if you are **not** computing
your system's outputs yourself, you must provide your **API credentials**.
To do so, navigate to "**Workspace settings**" -> "**Environment variables**," and click on "Add secret" to
add your `GOOGLE_AI_API_KEY`.
If you don't add the required Google AI API key, you'll encounter a "Missing API key"
error when Openlayer tries to run your AI system to get its outputs.
Make sure to read the API key from the environment in the script you provide
as the `batchCommand` in the [openlayer.json](/docs/development/openlayer-json):
```python theme={null}
import os
from google import genai
client = genai.Client(api_key=os.environ["GOOGLE_AI_API_KEY"])
```
## Using Google Gemini models as the LLM judge
Some tests on Openlayer rely on scores produced by an LLM judge. For example,
tests that use [Ragas metrics](/docs/integrations/ragas) and the custom [LLM
evaluator test](/docs/tests/catalog/l-l-m-rubric-threshold).
You can use a Google Gemini model through Google AI Studio or Vertex AI as the
underlying LLM judge for these tests.
First, go to **Settings** → **Environment** at the workspace or project level
and add one of the following authentication methods. Provider credentials are
not entered on the LLM-as-a-judge page.
### Google AI Studio
Choose **API Authentication** and add your `GOOGLE_API_KEY`.
### Vertex AI with service-account JSON
Choose **Vertex AI Service Account Authentication** and add:
* `GOOGLE_GENAI_USE_VERTEXAI` with the value `true`
* `GOOGLE_CLOUD_PROJECT` with your Google Cloud project ID
* `GOOGLE_APPLICATION_CREDENTIALS_JSON` with the full contents of your
[service-account JSON key
file](https://cloud.google.com/iam/docs/keys-create-delete)
Use this option on Openlayer Cloud, where you cannot mount a key file, or
whenever you prefer to store the credentials as an Openlayer secret.
### Vertex AI with self-hosted credentials
For a self-hosted Openlayer deployment, choose **Vertex AI Authentication** and
add `GOOGLE_GENAI_USE_VERTEXAI` with the value `true` and
`GOOGLE_CLOUD_PROJECT` with your Google Cloud project ID.
Your deployment can then authenticate with Application Default Credentials, a
mounted service-account key file referenced by
`GOOGLE_APPLICATION_CREDENTIALS`, or Workload Identity.
For either Vertex AI option, you can also set `GOOGLE_CLOUD_LOCATION`. It
defaults to `us-central1`.
### Select the judge model
Open your project and go to **Settings** → **LLM-as-a-judge**. Under **Default
LLM**, choose **Google**, type a Gemini model name, such as
`gemini-2.0-flash`, and select **Select**.
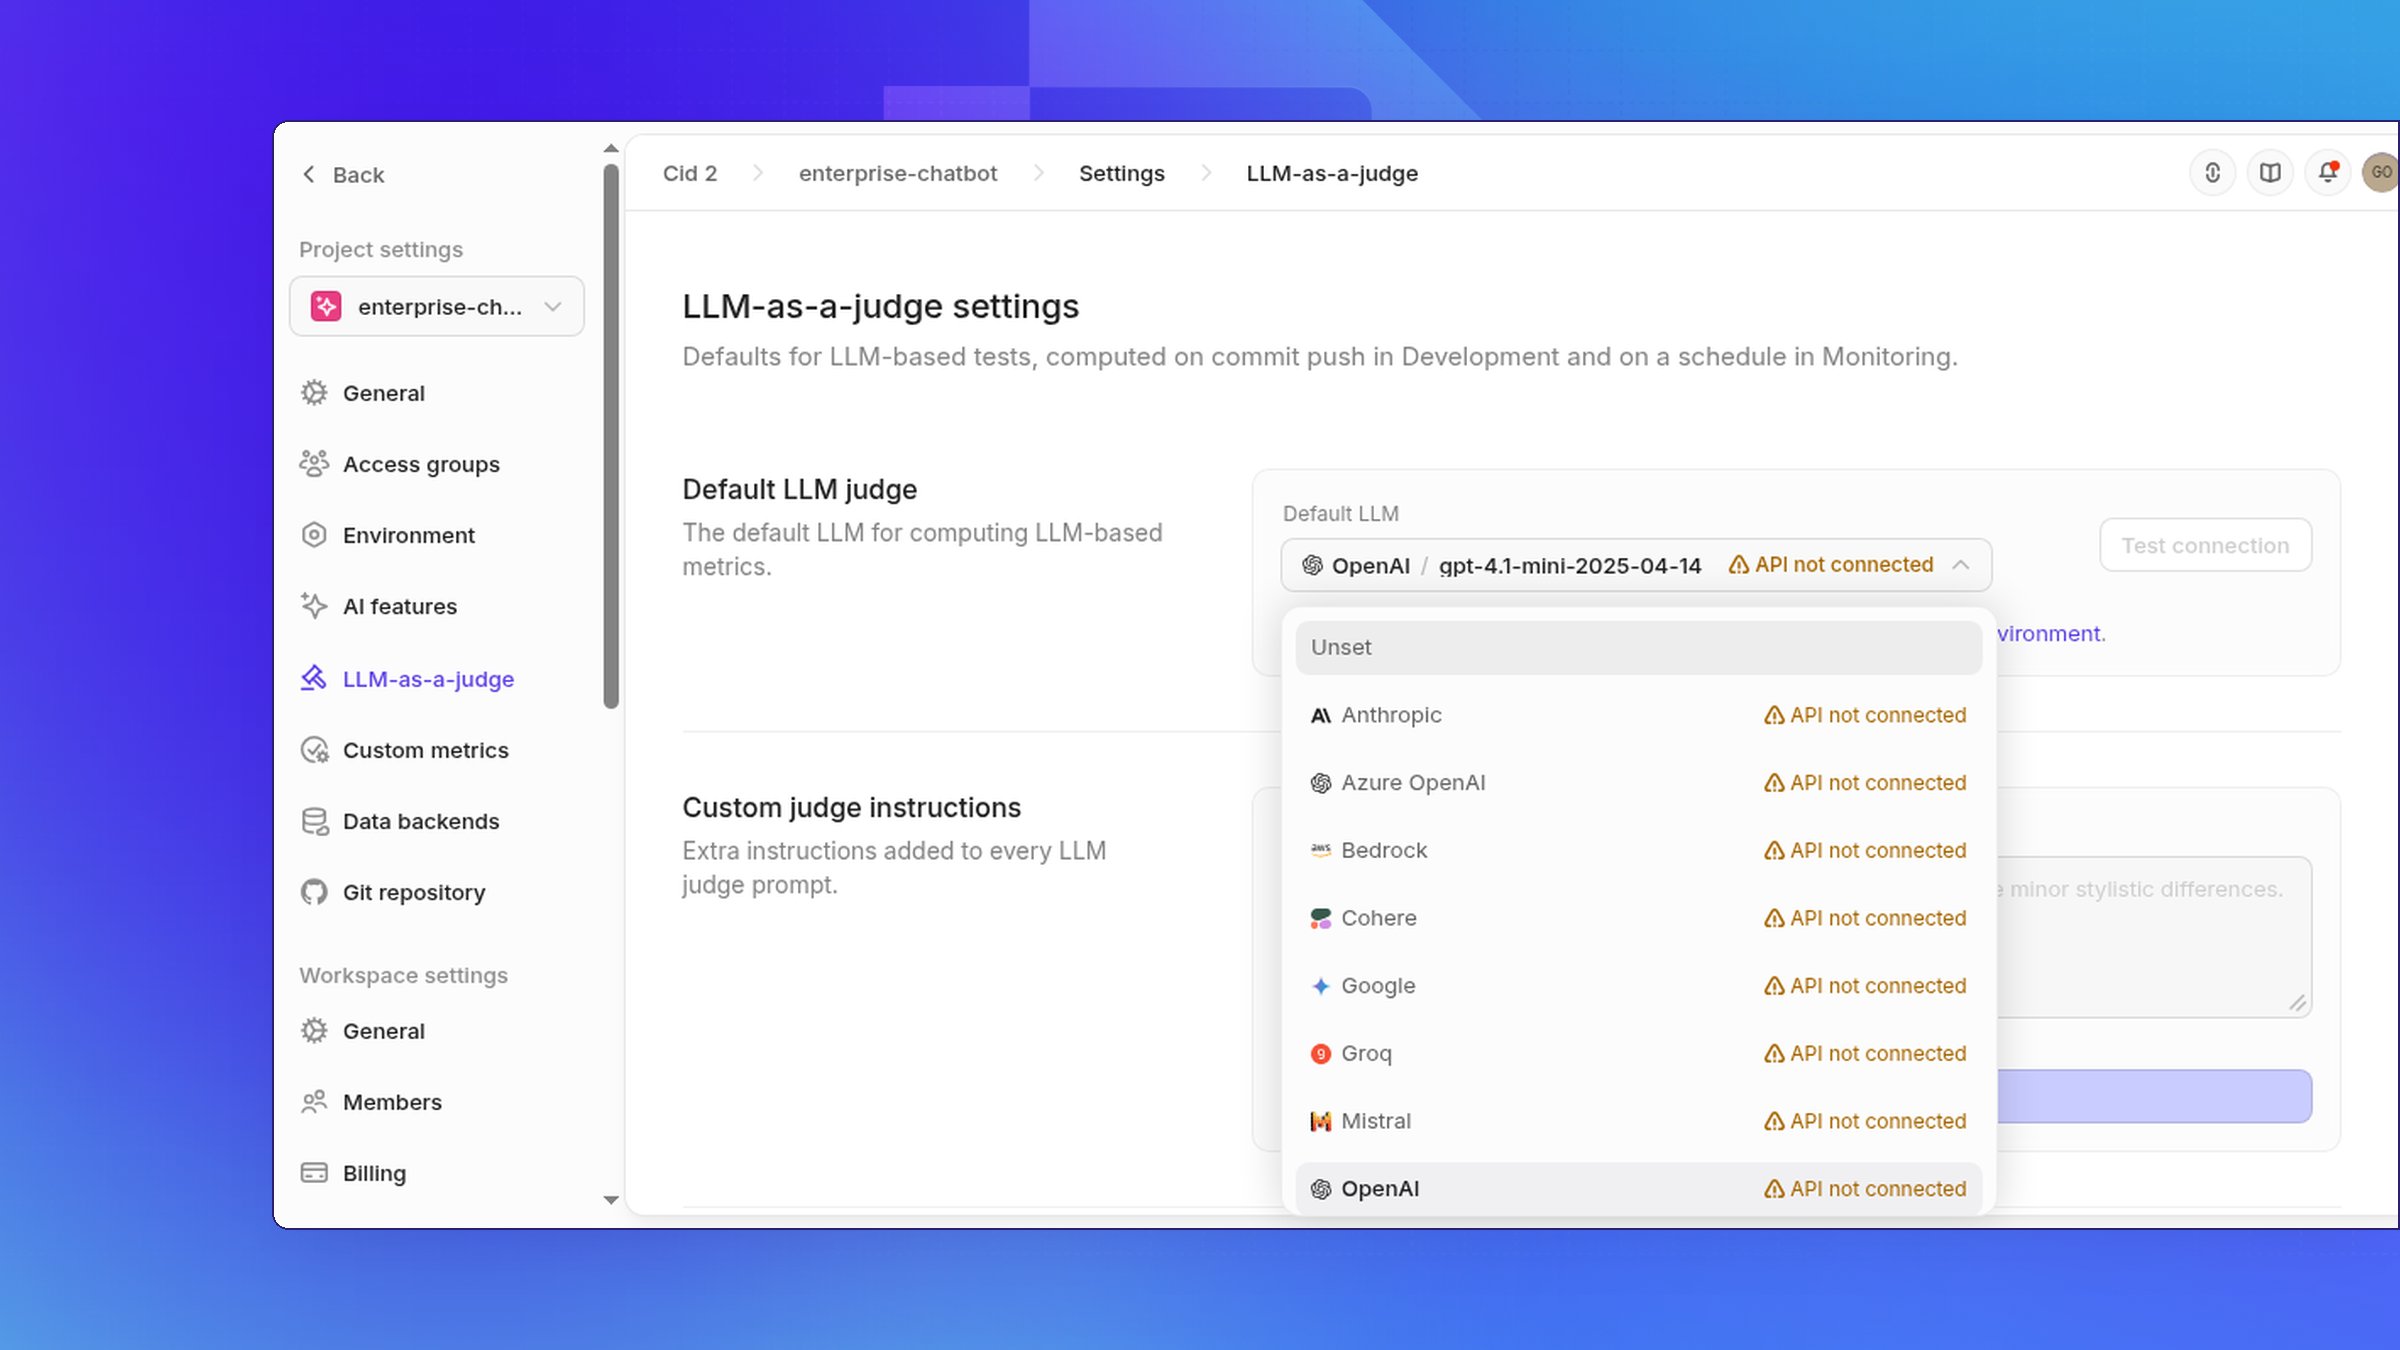 You can also add **Custom judge instructions** and configure **Sampling
settings** on this page.
### Troubleshooting Vertex AI connections
* If the Vertex AI API is not enabled, enable `aiplatform.googleapis.com` on
the project specified by `GOOGLE_CLOUD_PROJECT`.
* If billing is disabled, enable billing on that Google Cloud project.
* If permission is denied, grant the service account the Vertex AI User role
(`roles/aiplatform.user`).
* If `GOOGLE_APPLICATION_CREDENTIALS_JSON` is malformed, paste the full
contents of the service-account JSON key file.
This documentation is built and hosted on [Mintlify](https://mintlify.com), a developer documentation platform.
You can also add **Custom judge instructions** and configure **Sampling
settings** on this page.
### Troubleshooting Vertex AI connections
* If the Vertex AI API is not enabled, enable `aiplatform.googleapis.com` on
the project specified by `GOOGLE_CLOUD_PROJECT`.
* If billing is disabled, enable billing on that Google Cloud project.
* If permission is denied, grant the service account the Vertex AI User role
(`roles/aiplatform.user`).
* If `GOOGLE_APPLICATION_CREDENTIALS_JSON` is malformed, paste the full
contents of the service-account JSON key file.
This documentation is built and hosted on [Mintlify](https://mintlify.com), a developer documentation platform.